Showing posts with label quilt project. Show all posts

Tuesday, September 17, 2024

Quilted Throw Pillow Case for a Doctor

I have this really cute fabric perfect for doctors. It has hearts and squiggly lines representing ECGs. Last time I used it was to make gifts for my doctors in Singapore. I have a new set and thought I'd make something for my current set of doctors. 


I decided to make a throw pillow case for one of my doctors. She had a pillow in her clinic. I asked permission to measure it and surprised my doctor with the throw pillow case during my next appointment. I still wanted to learn something new for this project, so I made heart accents for the throw pillow case. I'll share next time how I made it (I'm still trying to perfect it). 

Here's how I made it:


Materials:

themed fabric

red fabric

black fabric

fabric for the back of the pillow

fusible interfacing

batting

backing fabric

Size:

17" x 17"

Monday, August 26, 2024

Quilted Monochromatic Tote Bag

From a bag full of colors, I thought I'd try doing something opposite. Black and white, well, a gradient from black to white. It took me a long time to finish this project since I lacked fabric that's in-between white and black. I eventually found some and got to work. It's a belated birthday gift for a friend and she told me she liked her totes to be black.


I didn't want it to be just black, so I thought I'd play around with the color. Oh boy, I didn't realize how hard it would be to find the best layout for the fabric. It took me awhile just to get it right. I had to consult with my son since he's better with colors than me. Things were easy after the layout was finalized. 

Here's how I made it:


Materials:

96 2.5" x 2.5" various fabric from black to white

lining

fusible interfacing

batting

thread

iron

Size:

12" x 16"


Monday, March 4, 2024

Star Wars Themed Quilt Cover for a Bench

This quilt cover project has been on my to-do list since 2022! I decided to just bite the bullet and start it last January. I thought I could finish it in two to three weeks, but no, it stretched to almost six weeks. I got busy doing other home projects. 

The design is quite simple, but making twelve pieces of 4x4 squares took awhile to make. I also decided to use the QAYG technique since the main quilt cover measures 58" x 44". I basically made a blanket with flaps. I left the flap open since the bench doubles as storage space. It's where I keep things that need to be further sorted (haha). 


Here's how I made the quilted cover:


Materials:

fabric with design (I used a Star Wars themed fabric which I got from Spotlight in Singapore)

four solid colors fabric (orange, yellow, blue, green)

black fabric (for sashing and binding)

backing fabric 

Design:


Size:

Main Cover - 58" x 44" 

Flaps: 20" x 12"

Sunday, January 21, 2024

Wonder Woman Tote Bag

I decided to start the year by making something useful and cute. I also wanted the satisfaction of finishing a project in a few days, so I made a tote bag. It was inspired from a jute bag given to me. It's the perfect size to carry stuff at home (I don't like putting stuff in my pocket). I'm now using the one I just made to house my portable air purifier and fan which I bring whenever we go out. I love it. 


For this project I wanted to start strong so I chose to use the Wonder Woman fabric I got from Spotlight. I matched it with pseudo demin fabric to bring out the colors. Figuring out the size of the pieces and piecing them together was easy. I couldn't find my stash of bag straps, so I ended up learning how to make bag straps for this project. You can also watch the video here.

Here's how I made the tote bag:


Materials:

fabric with design
solid color fabric (I used pseudo jeans)
fusible interfacing
wadding
backing fabric
thread

If making the strap:

solid color fabric
1.5" fusible interfacing (the thicker one for straps)
thread

Size: 8.5" x 4" x 9.5" (bag); 16" x 1.5" (strap)

Steps:

1. Measure and cut pieces of fabric.
2. Piece together fabric of main bag (top + middle + bottom + base). 
3. Iron the main bag and then add on fusible interfacing. Do the same for the sides of the bag. 
4. Sandwich with wadding and backing fabric. 
5. Stitch in the ditch the main bag. I used parallel lines for the sides. 
6. Assemble the main bag and the sides.
7. Bind the exposed parts. Start with the sides of the bag and then the top. 
8. Add the straps.

Monday, September 11, 2023

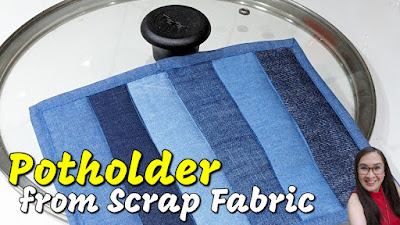
Scrap Fabric Project 1: Potholder

I decided to work on the scrap fabric I collected over the past few years. Aside from small pieces, I have some that are already pieced together. I set aside the excess pieces and thought it would be useful eventually. Found some of the pieced together denim-like fabric I used for the cat quilts. 


Decided to make a potholder since I need new ones. I finished the project in one sitting since it was practically ready to be quilted. I also used scrap wadding and scrap insulating wadding for the project. I also had leftover bias tape. I would have finished faster if I didn't need to film, lol

Here's the tutorial:


The steps:

1. Measure and cut the fabric.

2. Sandwich with wadding, insulating wadding and backing fabric. (I doubled it just to make it a bit thicker, but the insulating wadding would have been enough to keep heat out). 

3. Stitch in the ditch.

4. Prepare the backside of the potholder. Split into two pieces and fold in one side of both pieces. 

5. Align the front side with the backside, then bind with bias tape.

Materials:

scrap fabric

wadding

insulating wadding

backing fabric

fabric for backside of potholder

thread

Size:

8" x 6"


Sunday, September 3, 2023

Quilted Pouch with Sleeve

I felt I needed to add a small item with the laptop sleeve I made for my friend. I really want to learn how to install a zipper on my projects, so I thought a small pouch would be nice. She could use it as a pencil case or other knick-knacks. It would fit the pocket of the sleeve too. 

I decided to match it with the laptop sleeve, so I didn't change the design anymore. I had the fabric on my sewing basket, so I finished everything in one evening. It was a small piece, but nonetheless challenging when it came to adding the lining. I had to re-watch my quilted tote bag video to figure it out. I did it wrong the first time, so ended up doing it again, haha. Just remember to slip in the right side of the pouch with the lining facing the wrong side out (note for myself!). 


Here's the tutorial:


The steps:

1. Plan, design and cut the fabric.

2. Piece together. Start with the middle part, then add the outer sides.

3. Iron both sides. 

4. Sandwich with wadding and backing fabric. 

5. Pin to stabilize and stitch in the ditch.

6. Clean the sides.

7. Add the zipper.

8. Sew the edges together from the wrong side. 

9. Add the lining. Pull out the pouch from the open side of the lining. 

10. Close the open side of the lining.

Materials:

Little twin stars fabric

4 pastel solid color fabric

backing fabric

wadding

thread

zipper

Size:

9" x 5"

Saturday, March 11, 2023

Harry Potter Lap Quilt

Before I left Singapore, I made a mad dash to make some lap quilts for my friends. I knew one was a Harry Potter fan, so I thought I'd make one for him. I used solid fabric colors to complement the design. I just used simple shapes to make it easier for me to finish the quilt. Managed to finish it a few days before we went home. 


My friend said, Lily his pet dog, immediately commandeered the blanket as soon as she saw it. She looked so cute on it, that's why I asked permission if I could use her photos for this post. I'm glad they liked it, yay!

Here's a short video on how I made the lap quilt:


Materials:

Harry Potter fabric
solid colors fabric
backing fabric
wadding
thread
lots of pins and clips


Monday, August 22, 2022

How to Make a T-Shirt Memory Quilt Blanket

It took me three years to finally finish my t-shirt memory quilt blanket. It started when I cleared out my closet and I couldn't let go of the shirts because I love each and every one of them. They held 15 years of happy memories. Good thing I did some research before I started working on it because there's no second chances on the material I used. 


Here's a step by step video on how I made it:


The materials I used: 

old shirts

border fabric (I used the same fabric for the binding)

accent fabric (4 colors)

wadding

backing fabric (I used flannel)

thread

lots of pins, safety pins and clips

Here's how I made it:

Step 1: Determine first the size of the blanket you want to make. Then draw how you want it to look, best to include the size of each piece to help you know how many tshirts you need and how much fabric you need. 

Step 2: Cut the shirts. I used a 12.5" x 12.5" square ruler to make my life easier. Then iron on fusible interfacing. This will make the shirt stable. 

Step 3: Cut the binding. 

Step 4: Sew the vertical bindings by row. 

Step 5: Prepare the accent pieces. 

Step 6: Piece together the horizontal border by row. Then add to the bottom of each row. Remove the excess interfacing.

Step 7: Add the horizontal border by row. You can opt to quilt the border at this point. Then piece each row together. 

Step 8: Add the side borders. 

Step 9: Sandwich the quilt. 

Step 10: I decided to just quilt the accents to stabilize the blanket. 

Step 11: Make your binding. 

Step 12: Bind the edges.


Sunday, September 19, 2021

How to Make a Pinwheel Lap Quilt Fast!

I wanted to learn quilt short-cuts. I previously made a cheese pinwheel quilt blanket for my Mom by hand. It took me almost 2 years to finish it. While scrolling through Pinterest I found some recommendations on quilt short-cuts. As a beginner quilter my mind was blown and I immediately started planning the project.


I have been eyeing a blender quilt fabric at Spotlight for awhile. I thought it would be perfect for the project. I also wanted to make gifts so instead of making a full blanket I made 4 lap quilts. I worked on this learning project on and off for two months and was surprised how easy and fast it is to make a pinwheel quilt blanket. Here's the video of how I put together the pinwheel lap quilt -


*Watch previous videos too: Make 8 half squares at a time & Easy Pinwheel Quilt


I've also been practicing using my sewing machine more. I hand quilted two of the four blankets and I used the sewing machine for the other two. If you look closely the binding isn't perfect because I used the sewing machine. That's something I need more practice on. Well, I'm writing a nice note for my friends to give them a heads up it's not a perfect quilt! Haha. 


Sunday, September 12, 2021

How to Finish Your Quilt: Sandwiching and Binding

When I started quilting again a few years ago I realized I didn't really know how to finish my projects. I realized my Mom took care of finishing my projects when I was younger. 


When I restarted the hobby a few years ago, I made a small pouch. It was a messy affair, but I eventually got the hang of sandwiching and adding the binding. I originally manually made the binding. This took a lot of time. I tried buying ready-made binding, but it's so expensive. I eventually discovered the bias tape maker tool and that helped immensely. You can watch how to make binding here. 

So how does one go about finishing a quilt? Here's a video tutorial I made -


If you have any questions or comments, please write them down below. Happy Stitching!

Sunday, August 15, 2021

Easy Pinwheel Quilt

I have a pinwheel quilt I started a few years ago. It's not yet finished! Haha. I lost steam while making it and now I'm trying to figure out how to finish it. Before diving back into it I decided to research on an easier way to make pinwheel quilts. 


To force me to learn the technique I decided to make a lap quilt. I originally designed it to be half-squares in four colors, but decided last minute to make pinwheels. The first step was to make a gazillion half-squares. I worked on it for a few days (how to here). And this week I started sewing them up to become pinwheels. 

Here's how I've been making them quickly -


I made a gazillion half-squares. I'll probably be able to make four lap quilts out of this project. I'll post soon how I'll put the whole project together!

Saturday, July 31, 2021

How to Make 8 Half Squares at a Time (8aat)

I have just recently discovered the terms 4aat and 8aat after going through a quilt terms article. I got curious and researched more about 4aat and 8aat since I'm working on making multiple lap quilt blankets. 


So aat means at a time. 4aat means making four half squares at a time, while 8aat means making eight half squares at a time. It wasn't easy to find tutorials via Pinterest so I put myself to work to try the trick. I decided to make a video so I don't forget how to make it. 

Here's how to make 8 half-squares at a time -


I just made this based on using 12.5" x 12.5" square fabric. It makes approximately a 6" x 6" square which is what I have set for the lap quilt blanket I'm making. I'll share soon how I complete the project. For now I hope the tutorial helps you with your project. 

Saturday, July 10, 2021

Shophouse Quilt (A Sampler)

I saw a book on shophouses and was inspired by the colorful stores to create a quilt project. That's one of the reasons why I got pre-cut fabric from Lazada (short review here). I looked up templates on Pinterest, but none looked like a shophouse. The frontage of shophouses here in Singapore are intricate. I had to figure out how to simplify it. After several tries I ended up with a simplified version of the shophouse.

I like to play around with colors. I used my love for rainbows to select the colors for this project. I love that the pre-cut fabric I ordered gave a lot of options. That allowed me to experiment with the project. I will be using this as a sampler for future shophouse quilt projects I'll be making for our home.

Here's a short video on how I made it:


Materials:

Charm and layer cake pre-cut fabric (9 colors)

batting

backing fabric

fabric for the back of the pillow

quilting thread (9 colors)

sewing thread

Free template is available here.

Thursday, June 17, 2021

Easy DIY Quilted CD Case

I have a gazillion CDs from tests. My doctors kept putting them in an envelope and it eventually looked unsightly. Decided to make a case for it to keep it tidy.


This project just took me a day to make. I love how you can just customize things for your own use. Here's how I made it -


Size: 6" x 2" x 6"

Materials:

white fabric with design

black fabric

backing fabric (I used red fabric with hearts)

black fabric for binding

gold embroidery thread 

quilting thread

batting


Sunday, April 8, 2018

Quilt Project: Cat Pillowcase

I like checking out quilt projects on Pinterest. I've been checking out animal designed quilt projects and found this easy to make cat design. I then thought I'd make it for a couple who loves cats.

For the quilt I decided to use a set of fabric my Mom got for me from the US. The rulers I bought from trips made it easy to make the template.


It took me a few nights to finish the set of cat pillowcases and managed to give it to my friends last night. Here's Shirni with the cat pillowcase -